
En esta época de hype, se ve que no puede haber nada sin Inteligencia Artificial. Está en todas partes y no hay innovación posible si no pasa porque tengas que hablar con un agente automático (el bot de toda la vida, que ahora parece más listo), o si no lleva la etiqueta IA (o AI) como coletilla.
Para no ser yo menos que nadie, a pesar de que en general lo de la IA no me gusta demasiado, voy a entrar en materia, a mi estilo, explicando las cosas de un modo claro y conciso. Creo que es un buen modo de volver a escribir sobre tecnología, entrar en un tema tan omnipresente y a la vez tan desconocido.
A pesar de que en agosto se cumplirán 5 años desde que la médica me dijo aquello de «te tengo que dar la baja, no puedes seguir trabajando así», creo que todos mis años de experiencia desarrollando soluciones de lo más variado me acreditan lo suficiente como para no decir demasiadas tonterías. Tened en cuenta que mucho de lo que viene es una opinión, un modo de ver las cosas, que irá en contra de lo que hayáis leído hasta ahora, puede que por mi simplificación absurda 🙂
Vamos al lío.
¿Qué es?
¿Qué es la Inteligencia Artificial? Menuda preguntita, tiene muy mala leche. Podríamos entrar en que es un tipo nuevo de inteligencia que acerca a las máquinas al conocimiento humano, con todas las implicaciones filosóficas que conlleva. Sin embargo, eso me parece meternos en un auténtico barrizal.
A mí me gusta verlo como que es un «nuevo» paradigma de programación.
Para los ajenos al mundo del desarrollo de software, un paradigma de programación no es más que un modo de hacer programas. Algunos de ellos son:
- Imperativo: se especifica qué y cómo se tiene que ejecutar un programa paso a paso.
- Declarativo: se especifica el qué ha de hacer el programa, pero no el cómo.
- Funcional: el programa se forma por la composición de funciones de manipulación de datos.
- Dinámico: algunas cosas como los tipos de datos se establecen en el momento de ejecución y no cuando se hace (compila) el programa.
- Orientado a objetos: se definen tipos de datos complejos que encapsulan la información junto a las funciones que se les puede aplicar.

MovGP0, CC BY-SA 3.0, via Wikimedia Commons
Hay muchos paradigmas de programación y varios se pueden aplicar a la vez, o se puede aplicar distintos paradigmas con una única tecnología. Por ejemplo, en PHP se suele ver mucho script dinámico e imperativo, aunque se pueden crear programas estáticos y orientados a objetos.
Pues bien, la IA no es más que otro paradigma. Específicamente, es uno en el que se le da al sistema un conjunto (masivo) de datos y se le marca un modo de aprendizaje automático, y el sistema aprende por sí mismo a trabajar con los datos para crear un programa que los procese en adelante. A ese programa resultante se le llama modelo*.
* No el 100% de lo de la IA es esto, pero permitidme la reducción para facilitar la explicación.
Al usar términos distintos de los habituales se puede caer en el error de que es algo totalmente distinto, pero no, si lo piensas con detalle verás que definir un conjunto de datos y decidir que se use K-means para catalogarlos, no es muy distinto de declarar una lógica en Prolog, o definir un conjunto de clases y sus interacciones.
Las principales diferencias con los paradigmas más habituales son:
- Los recursos (tiempo y potencia) que se requieren para la «compilación» (la creación del modelo).
- En el momento de la declaración (cuando estableces los datos y los algoritmos estadísticos a usar) no se puede predecir el resultado. Ni siquiera usando lógica difusa se puede aventurar la exactitud del modelo, aunque con experiencia se pueda intuir una aproximación.
Ahora, como con todo paradigma, se puede conocer a varios niveles, desde ser un experto a no tener ni idea, pasando por infinitos puntos intermedios. Del mismo modo que puedes conocer lo básico de programación funcional sin saber lo que son las mónadas, o hacer programación dinámica sin siquiera entender lo que hace la reflexión, puedes usar sistemas y librerías de IA para crear modelos (programas) sin conocer, por ejemplo, cómo funcionan las redes neuronales.
¿Es nueva? ¿Por qué este boom?
La Inteligencia Artificial es un campo de estudio que existe desde hace décadas, casi desde el momento de alumbramiento de la informática. La mayoría de técnicas usadas ya existían el siglo pasado. Entonces ¿por qué ahora?
Creo que influyen dos circunstancias muy concretas que se han dado en las últimas décadas y han hecho que surja este auge actual:
- El boom del Big Data, que también estuvo hasta en la sopa aunque ya nadie se acuerde de él, que hizo que se almacenasen cantidades ingentes de información que luego se intentaban explotar con las técnicas de la época.
- Los avances en procesamiento paralelo que se dieron principalmente desde el surgimiento de la PlayStation 2, con los chips de tarjetas gráficas que han permitido usar técnicas de programación concurrente (otro paradigma) para procesar el Big Data en un tiempo computacional aceptable.
Parafraseando a aquella: «mezclando ácido clorhídrico con sulfato de sodio, ha hecho una reacción que flipas».
¿Es inteligente?
Deberíamos, primero, filosofar sobre qué es la inteligencia y qué tipos hay, pero muy a grosso modo podemos concretar en: NO.
Hablando de Inteligencia Artificial es seguro que todos tenemos en mente ChatGPT que es un LLM (modelo «largo» de lenguaje). Parece muy inteligente, pero en EGB un profesor (hablando con él de un niño que memorizaba la enciclopedia) me dijo que la memoria es muy diferente de la inteligencia entendida como la capacidad de razonar y resolver problemas.
ChatGPT recuerda muchas cosas, en concreto recuerda especialmente bien la cercanía estadística entre unas palabras y otras. También puede simular cierto razonamiento, haciendo deducciones básicas a partir de datos, pero le falta mucho para que podamos llamarlo inteligente en cuanto a un caso general.
Por ejemplo, las IAs generativas actuales que crean respuestas de texto, música o imágenes, no pueden actualizar sus modelos insertando en ellos nuevos casos aprendidos mientras se usan (aunque sí que se aprovechan esos datos para entrenamientos de futuras versiones del modelo). Esto es, no pueden aprender sobre la marcha (por ahora).
IA General
Lo que entendemos por inteligencia (inteligencia cognitiva al nivel de un humano), es lo que en el campo se conoce como Inteligencia Artificial General.
Es SkyNet en Terminator, la «voz del pinganillo» de Her, o el científico de Trascendence. Esa que Hollywood nos ha mostrado innumerables veces, que es capaz de realizar razonamientos lógicos y dado su acceso a todo el conocimiento humano puede convertirse en una super inteligencia que lo arregle todo.
Como el resto de la gente, no puedo ver el futuro, pero ahora mismo esa IAG no existe y estamos lejos de conseguirla.
De hecho, hace poco Apple sacó un controvertido paper (The illusion of thinking) en el que explicaba que lo que hay ahora no es más que una «burda» imitación de pensamiento. ¡No se podía saber!
Aunque es muy probable que en este caso la opinión de Apple tenga un gran sesgo por estar quedándose muy atrás en el campo de la IA y de los agentes (LLMs) con su otrora popular Siri y sus experimentos no demuestren nada, eso no hace falsa a la conclusión: los sistemas de inteligencia artificial actuales no piensan como lo haríamos los humanos.
¿Acabará con los trabajos?
¡Ojalá! Un sistema capitalista como es el mundo actual, requiere necesariamente que la gente tenga ingresos para poder ser consumidores. Si se acaba con los trabajos, el sistema debería reformularse para que la gente siga teniendo ingresos, o bien abandonar el capitalismo de manera inmediata. ¡Doble win!
Desde el momento en el que el luteranismo calvinista instauró ese «amor» por el trabajo, por el progreso (económico) y prosperar, el sistema se ha alimentado de la mano de obra que era a la vez productora y consumidora. No me pondré muy anarquista con esto, pero el «trabajo» remunerado es un pilar del capitalismo y no se puede acabar con uno sin hacerlo con el otro.
Sí que es cierto que introducirán modificaciones. Del mismo modo que la máquina de vapor cambió, por ejemplo, cómo se producían tejidos en las fábricas inglesas, la Inteligencia Artificial y los agentes conversacionales están cambiando algunos procesos que se irán depurando con el tiempo y afectará significativamente a algunas profesiones.
Sin embargo, toda introducción de una nueva tecnología ha traído cambios de este tipo y ha hecho que los profesionales se especialicen o se conviertan en artesanos, dando un nuevo valor a la producción. Volviendo al ejemplo inglés, tras la revolución industrial hubo (además de hambre y miseria) quienes se especializaron en controlar y arreglar las máquinas, y quienes siguieron haciendo las telas de un modo tradicional dándoles un extra de valor por la exclusividad.
Uno de los campos que más rápido está adoptando estas tecnologías es la programación de software, pero esto dudo que vaya a tener más implicaciones que el dejar de ver valor en el número de líneas de código, centrándose en lo importante: entender el problema y determinar la mejor solución. Esto dejaría la profesión de programador relegada a ser operadores y supervisores de estos nuevos sistemas de generación de código (especialización) o a seguir haciendo las cosas como «antiguamente» de un modo artesano que tendrá más valor simplemente por la componente «artística».
Ahora que lo dices ¿Y el arte?
Bien, hemos dado con una piedra bien gorda. Es una de las críticas más grandes que hay de las IAs generativas (además del gran consumo de recursos).
¿Se puede considerar arte algo hecho por una Inteligencia Artificial? ¿No deja de tener alma? ¿Para que queremos que las IAs hagan arte en lugar de recoger la basura?
A estas alturas de la batalla, todos hemos escuchado argumentos en una línea y su contraria. Desde que las técnicas que se usan para crear imágenes son las mismas que se usan para predecir la forma de plegar proteínas, hasta que es un robo y un plagio a los artistas.
Sin entrar en gustos, el arte generativo existe hace mucho tiempo. Es una modalidad artística en el que el artista crea máquinas o algoritmos que a partir de datos pseudoaleatorios producen piezas de arte. Por ejemplo, ahora mismo en el Centro Botín (un museo de Santander) se puede ver una exposición en la que el artista ha generado unas pistas de audio a partir del análisis de datos de la bahía de Santander como la altura de las mareas o la velocidad del viento, el artista ha hecho un algoritmo que es el que genera como resultado la obra final.
Si se considera el arte generativo como arte, hay que permitir llamar arte a las obras creadas por la IA. En este caso, los programadores de la IA serían los artistas y el operador no sería mucho más que un generador de datos pseudoaleatorios.
¿Y los datos? ¿Me van a robar? ¿Me han robado ya?
Como ya hemos dicho, para programar uno de estos sistemas de Inteligencia Artificial, uno de los elementos necesarios son datos. Muchos.
Aquí hay mucho debate por la fuente de esos datos. Por ejemplo, en el uso de descargas ilegales por parte de Meta (Facebook), o la venta de datos tan personales como puede ser el ADN.
Los temas legales suelen ser complejos y más en estos campos en los que hay que observar legislaciones de diversos países y continentes. Simplificando mucho, en España (Europa) hay dos puntos clave a tener en cuenta:
- Datos de caracter personal. Son aquellos que permiten identificar a una persona como nombre, teléfono o dirección. Si se almacenan estos datos ha de ser por el menor tiempo necesario, haber informado claramente de que se van a recopilar y cómo se van a procesar. En principio, dado el funcionamiento de la IA, no deberían ser parte del entrenamiento porque luego no se podrían sacar del modelo generado si el usuario lo solicita.
- Copyright. Aquí, la autoría no se puede transferir de ningún modo, sólo se pueden ceder derechos para el uso que sea hasta 70 años después de la muerte del autor, momento en el que pasa a dominio público. Por tanto, si yo compongo una canción tendría que ceder sus derechos para que una empresa de IA pueda usarla para entrenar sus modelos generativos.
Esto es lo que dice la teoría y la teoría está estupenda pero sabemos todos que la realidad es otra. Las multas que se imponen a las empresas que hacen mal uso de la información suelen ser irrisorias y los términos de uso que aceptamos para poder usar servicios en Internet acostumbran a ser tremendamente abusivos ya que no te dan opción y sólo puedes decidir entre tener el servicio o no tenerlo.
Además nos preocupamos mucho de datos tan comunes (y públicos) como el número de DNI mientras aireamos alegremente nuestras relaciones sentimentales o que estamos de vacaciones (y nuestra casa vacía), que son cosas mucho más íntimas.
Por tanto, no puedo hacer más que dar el mismo consejo que me dió Paula en su día: si no estás dispuesto a que lo sepa tu abuela, no lo pongas en Internet porque en cualquier momento puede quedar expuesto.
Si creas una obra del tipo que sea y no quieres que se use para entrenamientos, puedes poner unos términos de uso y no ceder el copyright, pero si realmente no quieres que se use lo único que está en tu mano hacer es no subirlo a Internet.
¿Cómo funciona todo esto?
No es porque lleve varias horas escribiendo, ni porque crea que no voy a saber explicarlo de un modo comprensible, pero me vais a permitir que de una explicación muy somera de cómo se hace lo de la IA. Si tenéis interés y os gusta como explico, siempre me lo podéis decir en un comentario y entramos en otros posts en materia de cómo se enseña a las IA.
Lo primero es obtener una fuente de datos y prepararla para su procesamiento. Estos datos se separan en dos paquetes, uno de entrenamiento (por ej. con el 80% de ellos) y el resto para comprobar el modelo resultante.
Con estos datos, se determina que tipo de algoritmo estadístico sirve mejor para el trabajo que queremos que haga el modelo y se entrena el modelo con ellos de tal manera que el sistema aprende por comparación.
Una vez que el modelo ha sido entrenado, se testea con el resto de datos. En caso de que el porcentaje de acierto sea suficientemente alto (un 90% por ej.), se da el modelo por bueno. Si no es así, hay que volver atrás y enfocarlo de otro modo.
En este proceso influyen muchas cosas, desde cómo se selecciona qué datos serán para entrenamiento y cuales para test, hasta cómo determinar si un resultado es satisfactorio, pero la base es esta.
Visto todo esto, la única conclusión que me gustaría dejar es que lo de la IA ni es tan nuevo, ni es tan bueno, ni es tan complejo.
Y como decía la entradilla de mi primer libro de Inteligencia Artificial:
Todo conocer depende de la estructura que conoce.

 Bitcoin is now entering a death spiral, writes Atuyla Sarin.
 Last week, the U.S. federal court ruled a case between the SEC and a crypto initial coin offering (ICO) project called Blockvest in favor of the project.
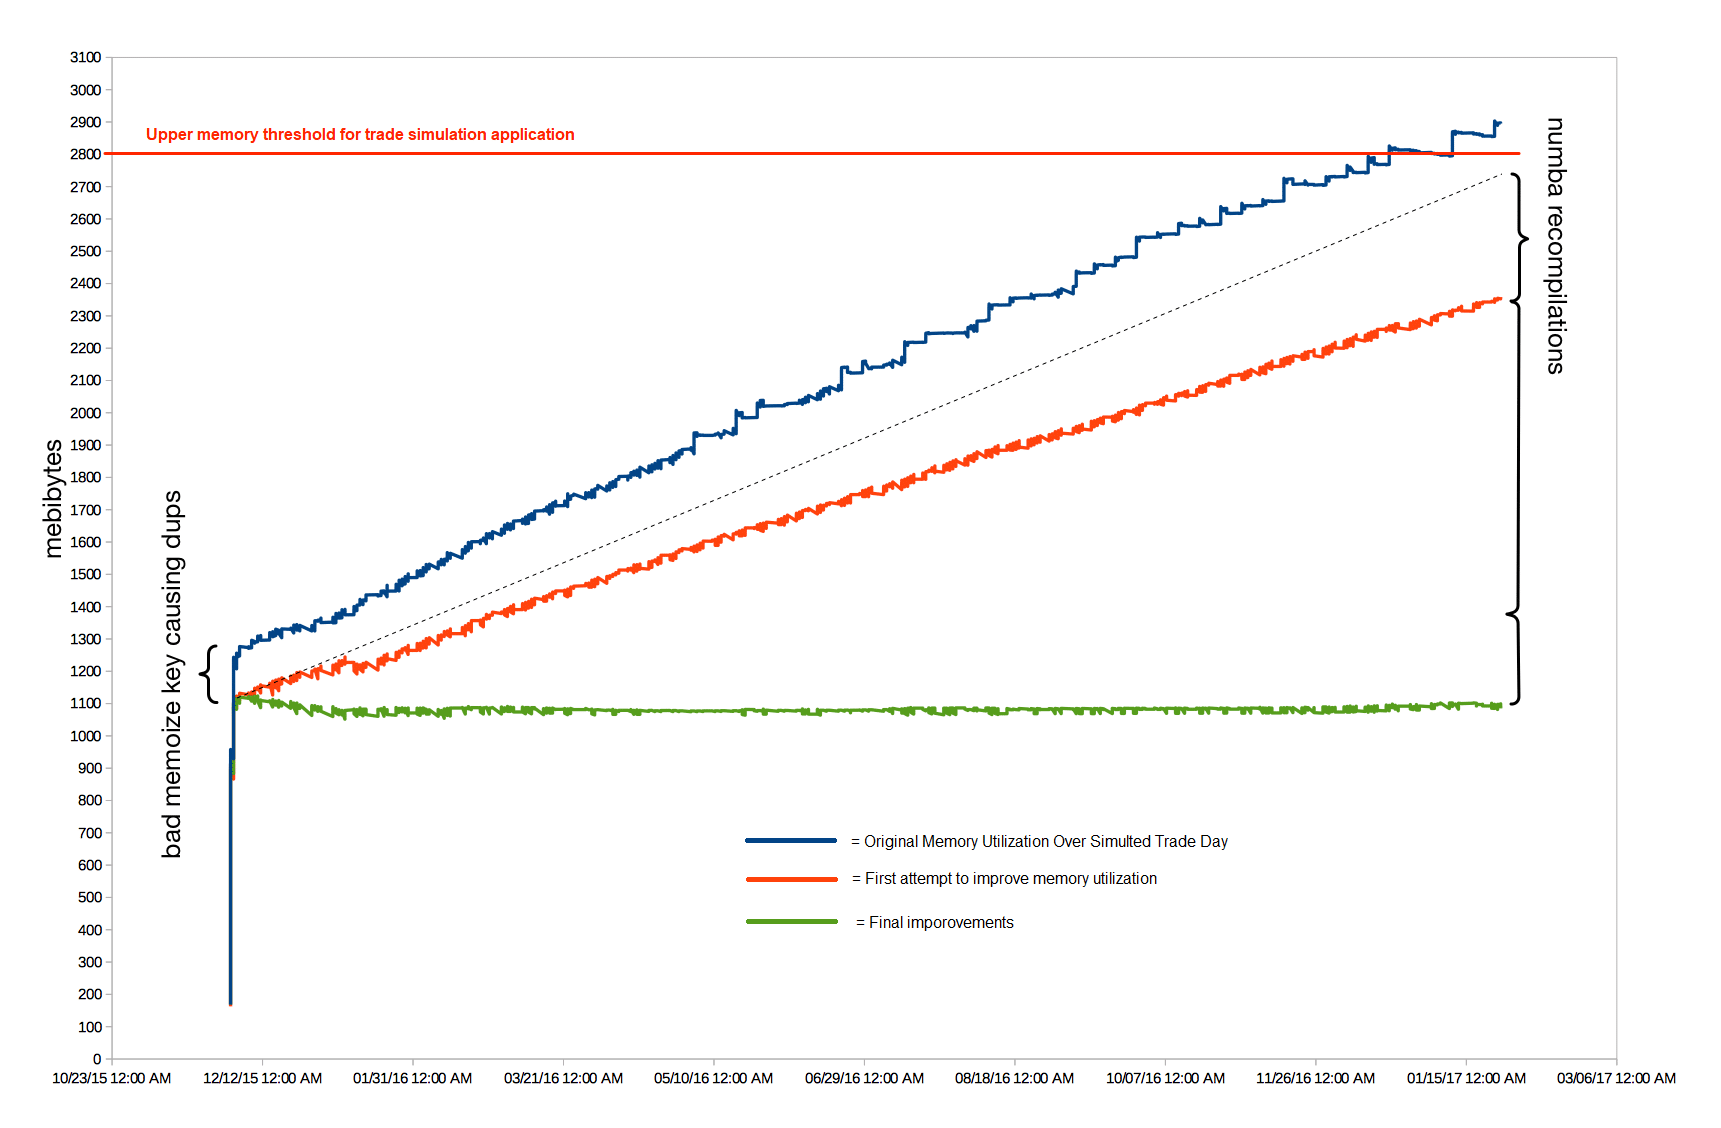 We found our hard to diagnose Python memory leak problem in numpy and numba using C/C++. It turned out that the numpy array resulting from the above operation was being passed to a numba generator compiled in «nopython» mode. This generator was not being iterated to completion, which caused the leak.
 When a pair of California Highway Patrol officers pulled alongside a car cruising down Highway 101 in Redwood City before dawn Friday, they reported a shocking sight: a man fast asleep behind the wheel.
 Monopolies are bad.
 Researchers have discovered that the so-called Rowhammer technique works on «error-correcting code» memory, in what amounts to a serious escalation.
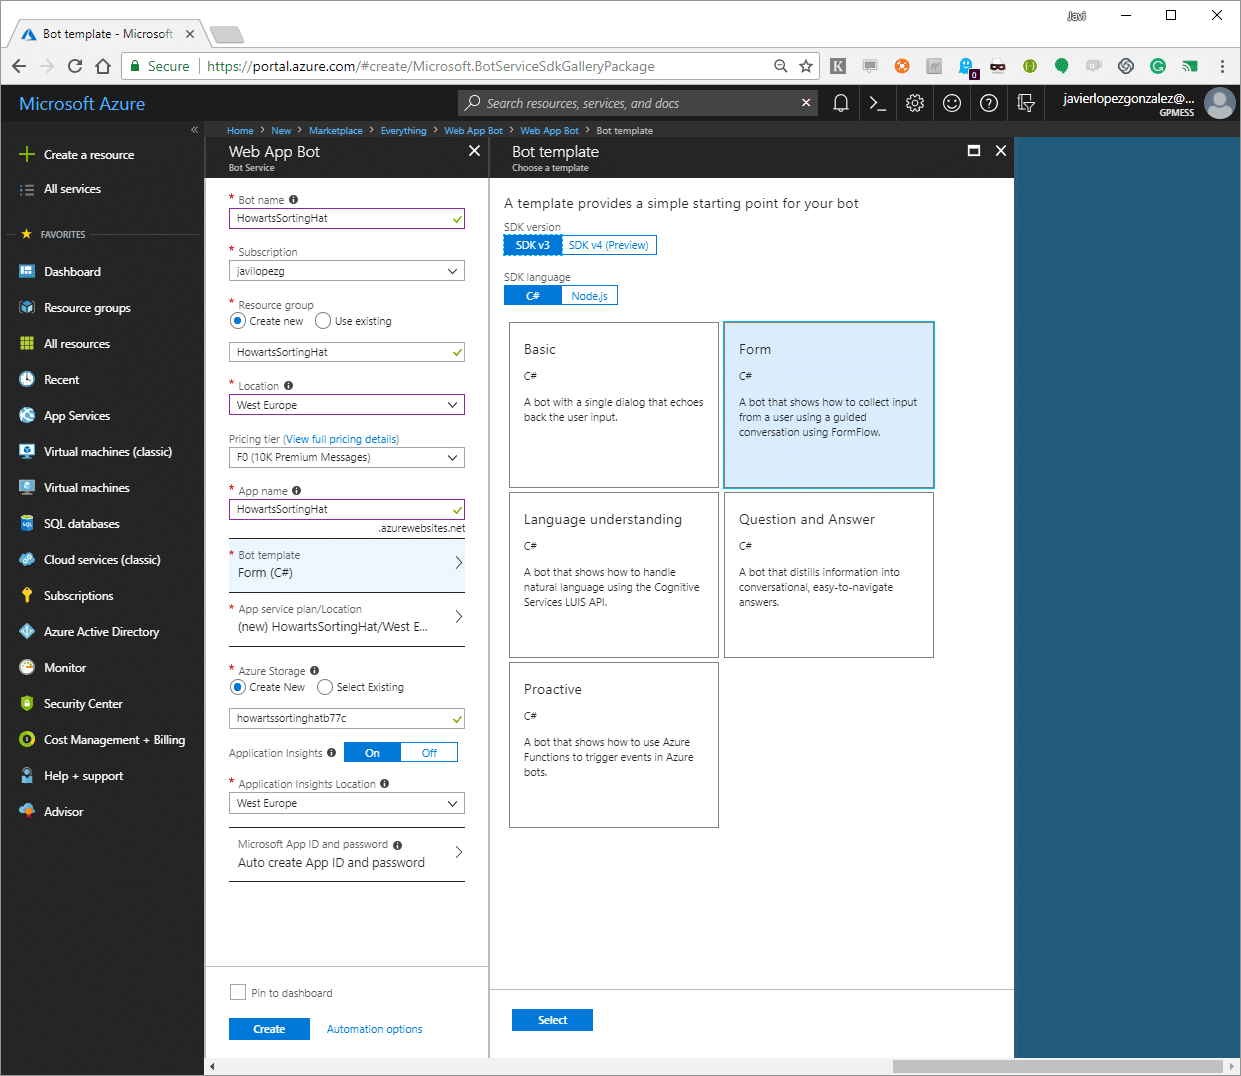
 We also have to do some minor changes in the controller to allow it use our new model instead of the one we deleted. The file name is MessagesController.cs and we will change references to the model on MakeRootDialog method.
 When we are capturing all the data, we only have to process that and to do this we will change code inside BuildForm method of our SortingTest. If we test it again, we will see that we already have all working. However, it’s not very beautiful that if our bot is made for Spanish speakers it speaks in English. FormFlow is ready to localize it to different languages but in our case only will change some details using attributes over our model.


